Part 1 of 3 – Setup: Connector, SlyTranslate, Polylang, and the first translation
I translate my blog into two languages. Previously, this meant: DeepL, Apple Translation (paragraph by paragraph) or you have to pay for a translation plugin on monthly basis. Then came WordPress 7 – and everything became simpler. I wrote a plugin that completely delegates the translation work to the LLM that is already running for me. No more copy/paste or plugin limits or costs. No external service seeing my content. Just WordPress, a local model (or an existing Account for OpenAI/Anthropic/Google), and a few plugins.
In this first part, I show what the setup looks like: from the WordPress Connector, translation via SlyTranslate to the first real translation of a post.
What WordPress 7 Changes
Before WordPress 7, there was no unified way to use AI models in WordPress. Every plugin had its own API key, its own provider logic, its own way of talking to OpenAI or Anthropic.
WordPress 7 introduces three concepts that fundamentally change this:
AI Client (wp_ai_client_prompt()): A single PHP function through which every plugin can send requests to the configured model. If you change the LLM, you don’t have to touch any plugin – just reconfigure the connector.
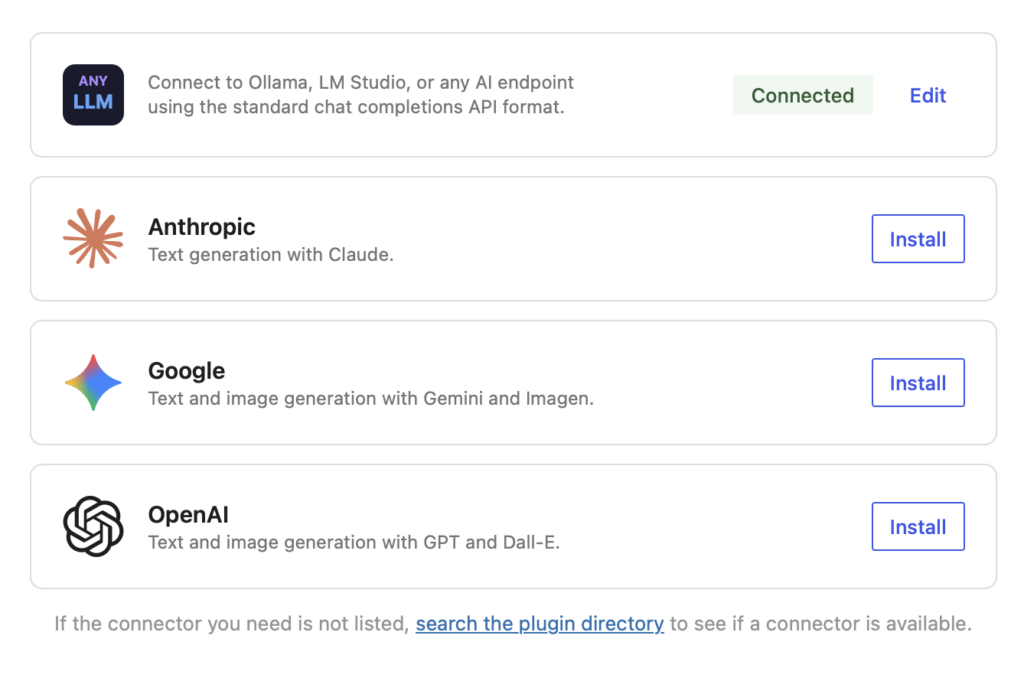
Connectors: Under Settings > Connectors, an AI provider can be centrally registered. There are ready-made connector plugins for OpenAI, Anthropic, Google, and – and this is the exciting part – for local, OpenAI-compatible endpoints.
Abilities API: AI actions are registered as named, reusable abilities. They are callable via the WordPress REST API and automatically discoverable for MCP clients (more on this in Part 2).
The result: SlyTranslate doesn’t have to worry about which model is currently running. The plugin calls wp_ai_client_prompt() – and WordPress delivers the answer, regardless of whether Ollama, Claude, or GPT is behind it.
Step 1: Setting up the Connector
☁️ For Cloud Users: If you don’t want to run a local server, install the appropriate connector plugin for OpenAI, Anthropic, or Google instead. The Abilities API and everything that follows remains identical – the connector is the only difference.
This can be done easily by open Settings > Connectors and use the LLM you have already in use.
Setting up for the Local LLM
I use llama.cpp on my mini PC. llama.cpp runs as a local server and provides an OpenAI-compatible endpoint. Anyone using Ollama, LM Studio, LocalAI, or vLLM does the same – the endpoint looks the same everywhere.
Install Plugin: Ultimate AI Connector for Compatible Endpoints / AI Provider for llama.cpp
Here two plugin recommendations. These are available for free in the WordPress plugin directory:
If you want to connect any AI chat API (local or others like groq..)
- Install and activate plugin in the WordPress backend
- Open Settings > Connectors
- Select “Add Connector” → “Compatible Endpoints”
- Enter Endpoint URL from your LLM:
http://IPADRESS:8080/v1 - Select model
If you want direct usage of llama.cpp
- Install and activate plugin in the WordPress backend
- Open Settings > llama.cpp
- Enter Endpoint URL from your LLM:
http://IPADRESS:8080 - Optionally if you set up an API Key in llama.cpp
- Open Settings > Connectors
- In “llama.cpp” → “Edit” and paste the API Key
Info: I run WordPress on my mini PC in my Kubernetes cluster. So I can just set up a local IP address, because it is internally available. If you have only a local LLM and a hosted WordPress, you have to provide the service to the outside (e. g. with cloudflared or pangolin). Be sure you set up a API key, so that it is secure.
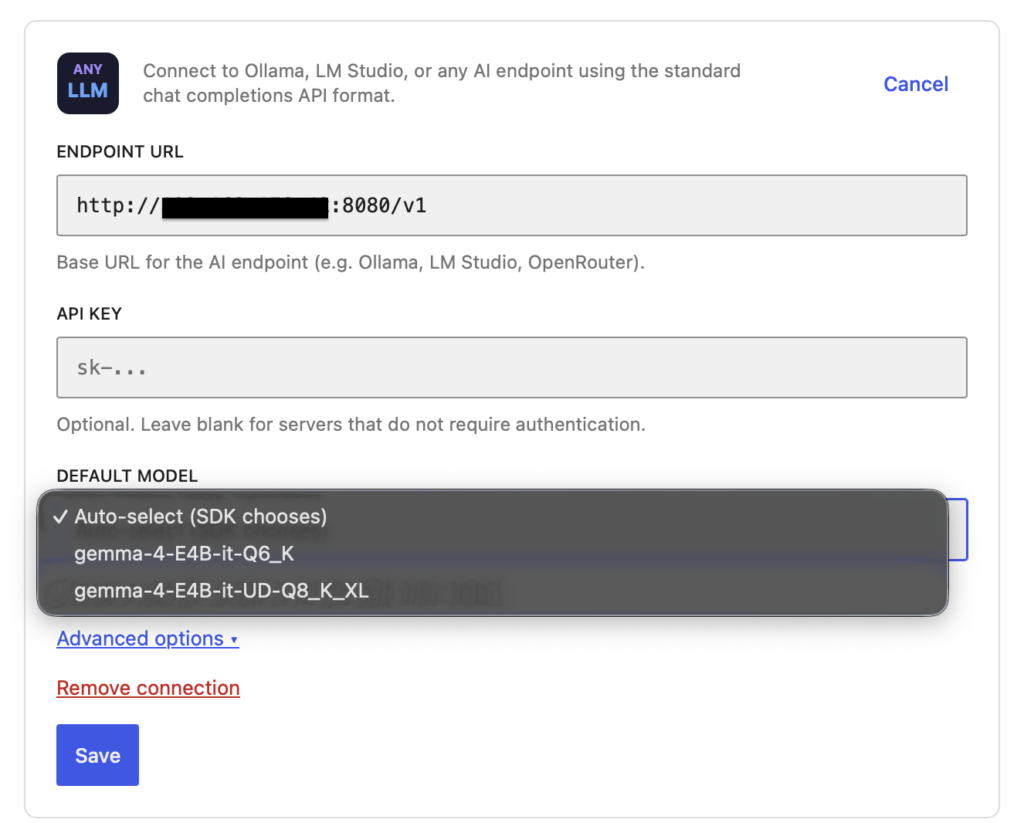
I use gemma-4-E4B for translations for now – fast enough, good for blog content. If you want more speed, use a specific model or switch to a cloud connector.
Step 2: Installing SlyTranslate
SlyTranslate is the plugin I wrote for this purpose. It registers translation workflows as WordPress Abilities – making them usable via REST, the Block Editor, and MCP clients.
Installation
Info: For now the plugin must install manually. The plugin is in the review queue for the offical WordPress plugin store.
- Download ZIP of the latest release
- Open in WordPress > Plugins > Add Pluing > Upload Plugin
- Upload the
slytranslate.zip - Activate plugin in the backend
Done. No configuration needed – SlyTranslate automatically uses the connector stored under Settings > Connectors.
What SlyTranslate Can Do
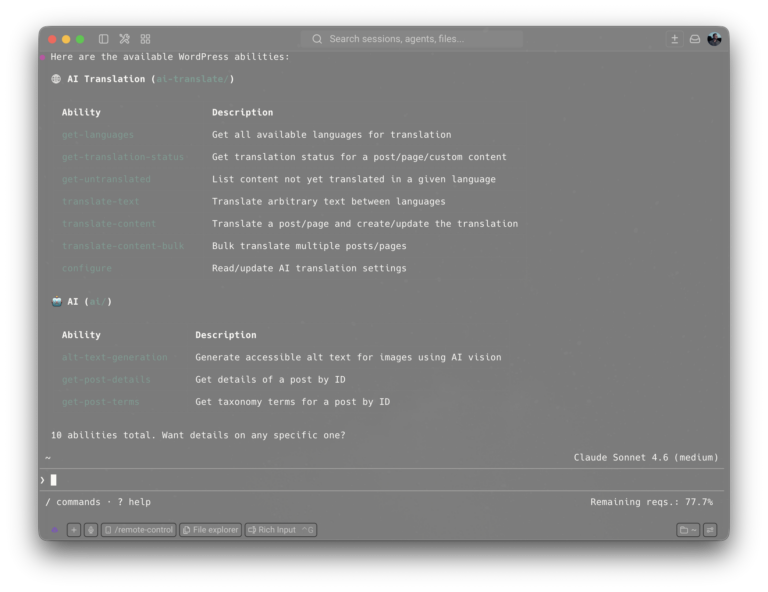
After activation, these abilities are available:
| Ability | Purpose |
|---|---|
ai-translate/get-languages | List languages exposed by the active translation plugin |
ai-translate/get-translation-status | Show which translations exist for a content item |
ai-translate/get-untranslated | Find posts, pages, or CPT entries still missing a target translation |
ai-translate/translate-text | Translate arbitrary text between languages; accepts optional model_slug per request |
ai-translate/translate-blocks | Translate serialized Gutenberg block content while preserving block markup; accepts optional additional_prompt and model_slug per request |
ai-translate/translate-content | Create or update a translated content item; accepts optional model_slug per request |
ai-translate/translate-content-bulk | Bulk-translate multiple content items; accepts optional model_slug per request |
ai-translate/get-progress | Return the current progress state for a running content translation job |
ai-translate/cancel-translation | Signal a running translation to stop and clear its progress state |
ai-translate/get-available-models | List models exposed by the configured AI connectors; can bypass the cached model list |
ai-translate/save-additional-prompt | Persist the current user’s Additional instructions value for reuse in editor and list-table flows |
ai-translate/configure | Read or update plugin settings (prompt template, prompt add-on, model, direct API URL, optional force-direct-API mode, context window, SEO meta keys, direct API diagnostics, and the last transport diagnostic snapshot) |
All abilities are accessible via /wp-abilities/v1/ and are marked as public for MCP clients.
Block Editor
SlyTranslate adds multiple workflows:
AI Translate Panel: If Polylang is active, a new panel appears in the document sidebar. There I select the target language and start the translation directly from the editor.
You can pick all of your models, that are available through the WordPress AI Connectors. This model setting is valid inside this post/page.
Additional instructions can be set up in the text field. And are stored with a browser cookie, so you have access to this instruction inside your browser.
Already translated pages/posts will shown up and you can open it directly with a link.
Inline Translation: Select text → toolbar → “Translate”. This also works without Polylang, for quick single translations in running text. In this translation you can select from any language, not only the languages, that are available with your language plugin.
Block Translation: This is also available for multiple blocks. Just select the “Translate” commands in the context menu in the “List View” or inline with the three dot icon.
Pages and posts
In the overview you can select one or multiple pages or posts and translate them in batch mode. After starting, you can put the translation in the background.
You can control the language, model and further instructions, before you start the translation.
Step 3: Polylang + SEO Plugin
SlyTranslate can translate text without Polylang – but for complete post translations with language linking, it requires a translation plugin. I use Polylang (more language plugins will come in future).
Setting up Polylang
- Install and activate Polylang
- Languages > Languages → Add languages (e.g., German as the main language, English as the translation language)
- Under Languages > Settings → Activate post types and taxonomies for translation
SEO Plugin: Simply Activate
I use “The SEO Framework”. SlyTranslate automatically detects which SEO plugin is active during translation and translates the most important fields, including:
- SEO Title and Meta Description
- Primary Category (if set)
- Existing analysis data is cleared so that the SEO plugin can recalculate it for the new language
This works without configuration for: Yoast SEO, Rank Math, All in One SEO, The SEO Framework, SEOpress, and Slim SEO.
The First Translation
Everything installed, connector connected, Polylang configured. Now for the first real translation.
Option A: Block Editor
- Open the post to be translated
- Select the target language in the AI Translate Panel (e.g., English)
- Click “Translate”
- SlyTranslate calls
wp_ai_client_prompt(), sends the post content to the LLM in chunks, compiles the translated post, and saves it as a Polylang translation.
Option B: REST API Directly
curl -X POST https://example.com/wp-abilities/v1/run/ai-translate/translate-content \
  -H "Authorization: Bearer <application-password>" \
  -H "Content-Type: application/json" \
  -d '{
    "post_id": 42,
    "target_language": "en"
}'The response contains the ID of the newly created translation post and a link to edit it.
What happens (under the hood)
SlyTranslate splits long content into chunks. The chunk size depends on the active model – for llama3.2 with its smaller context window, the pieces will be shorter than for GPT-5.4. The model mapping is stored in the plugin and can be manually overwritten via ai-translate/configure.
The translated post receives:
- Translated title, content, and excerpt
- All SEO fields of the recognized SEO plugins
- The Polylang language link to the original post
Summary
With this setup, the translation runs completely locally:
- Costs: 0 € (excluding your own hardware or your LLM subscription)
- No annoying plugins: No plugin ads or expensive plugin subscriptions
- Data Protection: For your own LLM – no content leaves your own infrastructure
- Quality: Good enough for blog content, adjustable via the prompt in
ai-translate/configure - SEO: Is automatically translated
🏠 Local-LLM Variant: llama.cpp on your own home server – completely offline, no API costs.
☁️ Cloud Variant: If you prefer to use GPT-5 or Claude, you just swap out the connector. The rest remains unchanged.
In the next part, we will make the entire setup even more comfortable: Setting up MCP and starting translations directly from GitHub Copilot or another MCP client – via a chat prompt, without opening the WordPress backend.
→ Next to Part 2: Controlling WordPress with AI – Setting up MCP and Automating Translations